Table of Contents
 Nowadays the popularity of over-the-range Microwaves has been rising. One cannot deny that not only do they make your kitchen spacious, but also add a unique touch to your house. If you too are planning to vent a Microwave through the wall, then you do not necessarily have to hire a professional technician. Most people do not know that venting a Microwave through the wall can easily be a DIY project.
There are numerous aspects to take into consideration when you are venting Microwave through the wall. In fact, a faulty job needs to be avoided at all costs, because if you do not drill the wall plates properly, then there is always a chance for it to come crashing down. So, how can you get the job done in the most efficient way possible? Here’s a step-by-step guide below.
Step # 1: Take Necessary Measurements
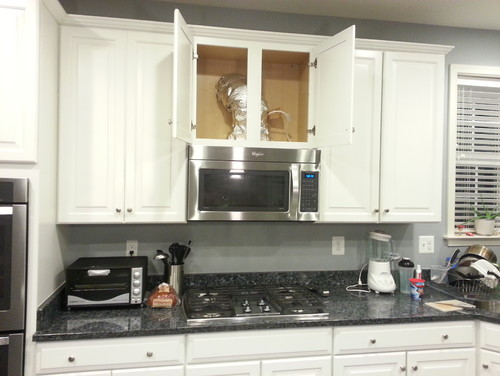
Most of the times people prefer to install the Microwave right over the stove. This is why home designers often leave an extra space there to make the installation easier. Depending on the size of your Microwave, take the necessary measurements to see that the area you have is a perfect fit or not.
The cabinets surrounding the Microwave can also prove to be useful. They would make sure that your Microwave firmly stays in spot and the brackets get the necessary support as well.
Step 2: Re-check Brackets and Tools
Venting a Microwave to the wall requires significant preparations. It can be frustrating to see that after making all the necessary arrangements, you do not have the right tools. One of the most important things you require to vent a Microwaves are wall plates and brackets.
Usually, you are going to find the wall plates and brackets inside the packaging of your Microwave. However, if you are not able to then do not worry. You can always purchase the brackets from a nearby electronic appliance shop. Once you have marked the list for all the necessary items, you can move on to the next step.
Step #3 Turn the Power Off
Safety measures should never be ignored, especially when you are dealing with electronic appliances. It is recommended that when you are venting a Microwave to the wall, you first start by switching off the main power.
Turning the power off directly from the breaker can ensure your safety. Venting a Microwave can be a relatively long process. Once you turn the electricity off, you would not have safety concerns and can easily get the job done.
Step 4: Drilling the Holes
Now that everything is set in place, it is time to drill the holes. Mark the place where you would like to install the brackets after taking the proper measurements and start drilling the holes. This may turn out to be a bit problematic for people who do not have a drill at home. However, you can consider going the old fashion way with a hammer.
Drills can make the job easier, so if you do not have one at home, it is recommended to borrow one from someone. Manually drilling holes to the wall can be a challenging process and can potentially involve risks of injuries as well. That is why make sure that you arrange a drill before proceeding with this step.
 Step 5: Mount the Brackets
It’s time to check the brackets that have come along with your Microwave packaging. Prepare the nuts and bolts, and mount the brackets at the position you have drilled the holes. When you are mounting the brackets, you need to be careful to make sure that the brackets are placed properly.
The last thing you would want is for your Microwave to come crashing down on the stove. Therefore, double-check if the brackets have been installed properly before proceeding to the next step.
Step 6: Locate an Electrical Outlet
If you are venting a Microwave over the stove, then having an electrical outlet nearby is important. Most of the times, you are going to find an electrical outlet inside the cabinets nearby. However, if you are not able to, do not worry. You can always get the assistance of an electrician to install a new outlet.
Make sure that the outlet you are getting installed by the electrician is in range and according to the power cord of your Microwave. Otherwise, you would have more extra work in your hands.
Step 7: Mount the Microwave
It is finally time to mount the Microwave. This is another step that you need to proceed carefully with. It is recommended to have someone by your side to assist you while doing so. Depending on the height of the brackets, mounting the Microwave on your own may prove to be a challenge.
Once you have mounted the Microwave, make sure that it is properly placed just to be on the safe side. Double-checking things can always help you avoid some major problems in the future.
Step 8: Connect the Power Cord
Now it is time for you to make use of the electrical outlet nearby. Check the length of the power cord of your Microwave and manoeuvre it around the cabinets in a way that it does not stand-out awkwardly.
If your power cord is short, there is nothing to worry about. You can always call an electrician to help you relocate the outlet. If that is not an option, then the electrician can even help you extend the power cord.
 Step 9: Turn on the Power
Now that you have made sure everything is in place, it is now time to turn on the power. Start by testing your Microwave and see if it works properly. If it does not, then the chances are that there may be a problem with your electrical outlet.
Try working around the electrical outlet, and if things still do not resolve, then try using another power source. If the problem is directly associated with your electrical outlet, then it is recommended to call a technician to look into it.
Step 10: Enjoy your Vented Microwave
Now you are ready to enjoy your vented Microwave. A Microwave vented through the wall can surely add a unique touch to the house. This is the reason the majority of the people have started to opt for it. You can now start cooking your meals in the vented Microwave and see how much of a difference it makes in terms of space efficiency inside your kitchen.
Conclusion
Microwaves have become an important part of our daily lives. Their popularity is indicated by the fact that it is one of the most used household electronic appliance. People often think that venting one through the wall can be a challenging job to accomplish. However, if you follow the instructions properly, then it can easily be done in no time. Therefore, if you want to get the job done without having to pay an extra dime, then follow the steps we have discussed.